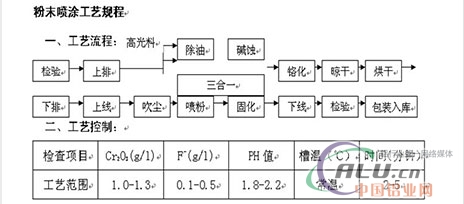
Spray shop operating procedures and operating instructions

1. Immerse the pre-treated profile in the bath for 2 to 5 minutes, tilt the rack to remove any residue, and wash it twice. After drying, observe the chromizing effect on the surface of the profile. The surface should display a rainbow-like color, indicating proper chrome treatment. Inspect the chromed profile to ensure quality and uniformity. 2. Drying: The drying temperature should be maintained between 80°C and 100°C, with a duration of 10 to 15 minutes. Allow the material to air dry first, then place it into the oven for the specified time. Afterward, lift the material to the lower row for further processing. 3. Shelf Preparation: Hang the profiles on specialized spray racks. Ensure that only the same type and specification of profiles are placed on the same rack. Avoid mixing different types of profiles on one rack to prevent contamination or misprocessing. 4. Dust Removal: Use compressed air at a pressure of 0.6 to 0.8 MPa to blow off any dust from the surface of the profile. This step ensures a clean surface for better adhesion during the spraying process. **Third, Powder Spraying:** 1. **Powder Quality Requirements:** - Conductivity (Ω/cm): 10¹â°â€“10¹ⴠ- Particle Size (μm): Flat light powder – 32–36; Yarn pattern powder – 38–45 - Volatile Content (%): ≤ 0.5 2. **Spraying Process Notes:** - Ensure the gas is clean and dry. Do not allow water or oil contamination. - When recycling powder, take precautions to avoid pollution and degradation. - When changing powders, thoroughly clean the powder room, powder bucket, and related equipment to prevent cross-contamination. - Maintain good conductivity by ensuring the polished racks are clean and properly grounded. **Fourth, Curing:** - Temperature: 200 ± 10°C. The front section should be slightly cooler, while the rear is slightly hotter. - Curing Time: 20 to 30 minutes. **Control Parameters:** | Control Item | Voltage (KV) | Current (μA) | Gun Distance (mm) | Line Speed (cm/min) | Pressure | |----------------------|--------------|--------------|-------------------|---------------------|----------| | Automatic Gun | 60–100 | 25 | 150–200 | Automatic | | | Pistol | 100–150 | 2–3 | 100–150 | | | | Air Supply Pressure | | | | | 0.5–0.7 MPa | | Atomization Pressure | | | | | 4–4.5 Pa | | Powder Pressure | | | | | 10–100 Pa | **Fifth, Quality Control:** - **Surface Quality:** Ensure no defects such as bubbles, cracks, or uneven coatings. - **Coating Thickness:** Should be between 40–80 μm. - **Gloss:** Flat light material – 40–90, high light material – 80±7. - **Indentation Hardness:** ≥ 800. - **Adhesion:** Must meet industry standards. **Spray Booth Equipment Operating Procedures:** 1. Power up and start the air compressor and gas turbine. 2. Check the cleanliness of the spray room and ensure that powder colors do not mix. Verify that the size bucket and small cyclone device are clean. 3. Confirm that the manual and automatic guns, as well as the barrel, are free of debris. 4. Check that the compressed air is clean and regularly drain any accumulated water. 5. Ensure all grounding wires are properly connected and functional. 6. Verify that the elevator program and front/back positions are set correctly. 7. Add more than 25 kg of powder to the powder bucket to prevent overflow. 8. Turn on the power for 30 seconds to check the fluidization effect—ensure it’s even and consistent. 9. Adjust the powder discharge amount and fan-shaped spray pattern. The powder discharge should be between 60–100 μm. 10. Adjust the AC voltage and monitor the LEO display. For complex sections, use higher voltage; for simple areas, use lower voltage. Keep the voltage between 60 kW and 80 kW. **Drying Furnace Equipment Operating Procedures:** 1. Open the electrical cabinet and check if the power switch is allowed to close. If there is a lockout, have a responsible person remove it. 2. Check that the liquefied gas pressure gauge reads 2 MPa. 3. Press the start switch to activate the circulating fan. 4. Start the exhaust system, curtain, and burner. Observe that the burner is burning properly. 5. Stop and check the temperature readings on each temperature control table. They should be between 100–130°C. **Curing Oven Operating Procedures:** 1. Check that the liquefied gas pressure gauge is functioning normally. 2. Start the circulation fan. 3. Activate the exhaust system. 4. Start the curtain. 5. Turn on the 1# and 2# burners and confirm they are burning. 6. Verify that all temperature control tables are operating within the correct range. The temperature should be controlled at 180–200°C.
MeanWell LED Driver is a high-quality power supply device designed specifically for LED lighting applications. It is manufactured by the well-known Taiwanese company MeanWell, which is known for its expertise in power supply technology. The LED driver is designed to provide a constant current or voltage output to LED lighting fixtures, ensuring that they operate at optimal levels and have a longer lifespan. The MeanWell LED Driver is available in various models, with different power ratings and features to meet the needs of different applications. It is widely used in a variety of lighting applications, including indoor and outdoor lighting, commercial lighting, and architectural lighting. With its high reliability, efficiency, and safety features, the MeanWell LED Driver is an excellent choice for any LED lighting project.
meanwell constant current ,MeanWell , power supply,led street light led driver,waterproof led driver
Yangzhou M.T. New Energy & Lighting Group Co., Ltd. , https://www.mtstreetlight.com